Create this easy DIY Wood Tissue box cover for your home. It came be made to your liking with stains, paint, and stencils.
The holidays are quickly approaching which means lots of family get-togethers, parties, and dinners. It is important that household supplies like Kimberly Clark products are available for guest, especially if you are expecting a lot of people. Buying a larger supply from places like Bj’s Wholesale Club helps maintain your stockpile which means less time going to the grocery store and more time spent with your loved ones! This is a sponosred post. All opinions stated here are my own.
I have a big Puerto Rican family that gets together pretty often. Now that I have a bigger house (with a pool!) hosting has become more frequent. I always make sure to stock up on the essentials – Cottenelle toilet paper, Kleenex tissue paper, and paper towels. We always alternate holiday festivities – Thanksgiving is held in my aunts house, Christmas Eve at my other aunts house, Christmas day at my house, and New Years Eve at my parents house. We all bring a dish to contribute to the food selection. Love me some pasteles, pernil, and guineitos! I love that my kids are growing up with their cousins around just like I did when I was a little girl. There was a point that my family all lived in the same apartment building in New York. We were always such a close knit family and I’m glad we can continue that tradition with our own kids.

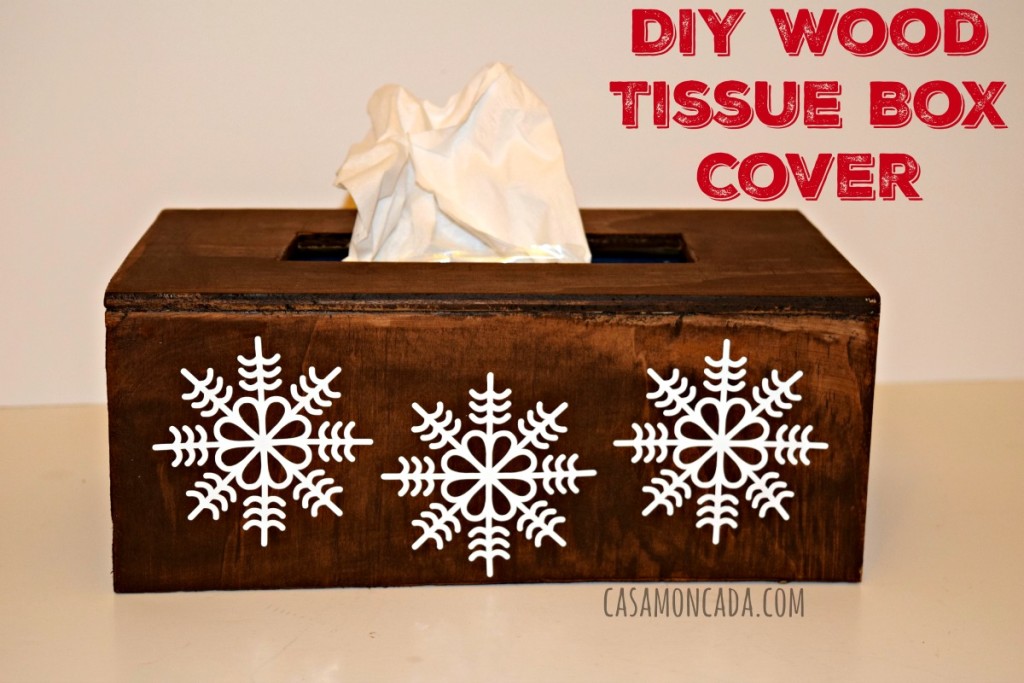
I do love the decorative boxes from Kleenex that are available at BJ’s Wholesale Club but I love the look of the wood box cover. The wood box cover is really easy to make! I love that ti can be personalized for different holidays. I used my die cutting machine to add vinyl snowflakes to my DIY wood tissue box cover but I can change that to a Christmas tree later on. If you don’t have a die-cutting machine – grab a stencil and paint your design. You are starting with a blank canvas so work your magic!
DIY Wood Tissue Box Cover
Supplies:
- 1/4 in. x 2 ft. x 4 ft. PureBond Maple Plywood Project Panel
- Liquid Nails
- Sandpaper (fine)
- Dark Walnut Wood Stain
- Paint/foam brush
- Cloth
- Clamps
- Die-cutting machine (optional)
- Vinyl (optional)
Cuts:
- Top – 10¼ x 5½
- long sides – 10¼ x 3¾
- short sides – 5 x 3¾
- middle hole – 5½ x 2
Step 1. If you are starting with a big board, draw out your measurements then make your cuts. Remember measure twice, cut once! (Thanks to my husband for making the cuts for me!)

Step 2. Now that you have your pieces cuts, lightly sand your edges and smooth out any bumps. Wipes any dust with a wet napkin.

Step 3. Start gluing and assembling. (We went with liquid nails because we really wanted a strong hold and didn’t want to put holes in the wood). Use your clamps to hold the pieces together. Allow plenty of time in between for them to dry.

Step 4. Once your pieces are assembled and well dried – start staining (follow directions from the can). I brushed it on then wiped with a sock. Allow it to dry completely. You can stain another coat if you want a darker color.


Step 5 (optional). Using your die-cutting machine, cut out the design you want. I wanted snowflakes. You can pretty much put anything – a phrase or picture.

Step 6. You are done! Enjoy your masterpiece!
Now my Kleenex tissue boxes will have a cute cover for when guests come over. If I get bored with the snowflakes I can just peel them off and add a new design!

You can find all the Kimberly Clark products at your local BJ’s Wholesale Club. It is so convenient to be able to buy everything I need at Bj’s from baby products to household essentials without heading to the grocery store every week – saving me time and money. Now I can spend more time with family and less time worrying about that next grocery trip.

I love how the snowflakes pop out on this box. This is a great DIY project for the kids to make for the upcoming holiday season. Love the deals you can get a BJ’s perfect for stocking up!
What a nifty idea! The cardboard Kleenex boxes don’t survive rough handling in my household, and the wood box looks so pretty. I don’t have a die-cutting machine but will definitely look for pretty stencils and plywood and try this out.
Thi looks simple enough that even I could do it… and that’s saying something! Can’t wait to give it a go this weekend. Would be great to have a cover for maybe EVERY holiday I decorate for!
I love the cute little snowflakes on there! I think this would be a fun project for the chilly days we have coming up! Great for an indoor project that is not too terribly messy but fun to do with the family. I love easy projects that we can all do together!
I love it! Very ice to do with the kids and I would do one with each child as a project to put in their bathrooms and then do one for my bathroom. We would also try to stick with the seasons too!
Such a clever DIY, this is definitely the season for sniffles and all that so having tissues on hand is a must. This would be a great idea to gift to teachers also and a great way for kids to help make it using various holiday stencils.
I really like your tissue box. It is so cute and looks great in the bathroom with tissues. I want to make this and have one in my house when my family comes over for the Holidays!
That is so awesome!!! I love this look of it. I am such a rustic style person and this is so me! I always have one though. My mom makes the plastic canvas style ones with yarn and fun patterns. =D Thank you so much for sharing! This is totally awesome!